A laser-focused guide to engraving: Tips and tricks for the most popular materials
by carly_mchugh | 3 May 2023 2:48 pm
 [1]
[1]By Mike Dean
When it comes to laser engraving, carbon dioxide (CO2) engravers are capable of handling almost any material, from wood to acrylic, treated aluminum to glass, and well beyond. However, how do you know what speed and power settings to use for different materials? It is a simple question with a not-so-simple answer.
Speed and power settings depend mainly on two things. The first is the material you are engraving or cutting, and the second is the wattage of the machine you are using. On materials such as wood, the higher the wattage, the faster you can set the speed to get to the same engraving depth as a lower-wattage laser. Therefore, the higher the wattage, the more throughput you can achieve from the same system. Materials such as acrylic require little power to engrave, so they can be marked almost as quickly with a low-wattage laser as they can with a high-wattage laser. The thickness of the material you are engraving or cutting will also impact the speed and power settings you select. For example, a 19-mm (0.75-in.) piece of acrylic will take more power to cut than a piece that is only 6.3 mm (0.25 in.) thick.
Below is a general overview of popular engraving materials, along with some helpful tips for how to produce the best possible results for each project.
 [2]
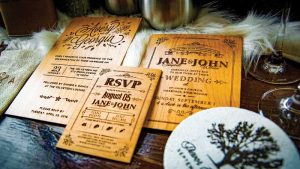
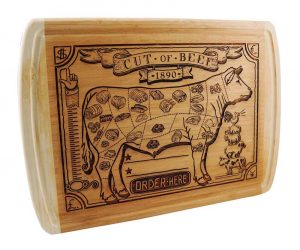
[2]Wood
Wood is by far the most laser-friendly material. It can be engraved and cut very easily, and lighter-coloured varieties—such as cherry or maple—produce a nice contrast where the laser burns away the wood.
Additionally, every type of wood has its own characteristics. Some are denser than others, with harder woods requiring more laser power to cut or engrave. The most common hardwoods used with the laser are cherry, walnut, maple, and alder. These woods have relatively few veins of grain running through them, while oak has medium to large veins. Since it is much grainier, oak is a less desirable choice for wood engraving, as designs vary greatly in height, and they also have a very non-uniform appearance.
Tips and techniques
- Wood is a great material to laser engrave because it discolours, and the depth of engraving is larger compared to most materials. The downside is it takes a lot of power to deeply engrave wood at high speeds.
- Most wood can be engraved using full power, whether you are using a 25-watt (W) laser or a 120-W laser.
- Depending on the wattage of your laser, the best approach is to set the power at 100 per cent and adjust the speed to obtain the desired depth.
- Wood is very simple to work with, and you can produce nice detail with as little as 300 dots per inch (DPI). Further, 600 DPI engraving produces even better results.
- Greyscale clipart images look superb when engraved into wood. Since the wood reacts differently to each level of grey, you can produce a remarkable amount of contrast.
- Engraving greyscale clipart images also creates a shading effect that is almost three-dimensional in appearance.
- Greyscale photographs can also look great, but these images usually need to be processed through specialty software before they are truly ready to be engraved into wood.
- Your results will turn out better if the grain of the material runs parallel with the X-stroke of the machine’s carriage.
 [3]
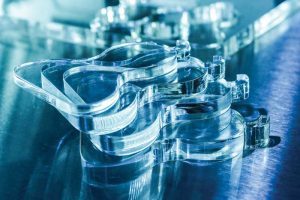
[3]Acrylic
Next to wood, acrylic is the second most popular material for laser cutting and engraving. It is easy to both engrave and cut, comes in a wide variety of shapes and sizes, and can be relatively inexpensive.
Acrylic comes in two forms: cast and extruded. Cast acrylic is used for almost all engraving purposes, because when it is engraved, it produces a white, frosty look that makes for a clean contrast against the clear material. Extruded acrylic remains clear when engraved and does not produce much of a contrast. On the other hand, it is ideal if you are only going to vector cut. The material also has a lower melting point, which produces an almost flame-finished edge when cut with the laser.
Tips and techniques
- Most acrylic is reverse engraved on the back side of the item. This produces a “look-through effect” from the front of the surface. It is recommended you remove the top protective cover from the acrylic before engraving. Leave the bottom protective layer on, so it remains intact, to prevent scratching while handling the material.
- Remember to reverse or mirror your artwork prior to starting an engraving project on acrylic.
- Engrave the acrylic at a high speed and low power. A small amount of power is all it takes to mark it, and if you set your power level too high, you run the risk of distortion.
- Set the focus so the acrylic is slightly further from the lens than normal. Lowering the focus by approximately 1.6 mm (0.06 in.) will soften the engraving, so each individual raster line blends better with the lines above and below, producing a smoother, more pleasing look.
- A large number of products are painted on one side to add colour to the clear acrylic piece. You can engrave directly through the paint into the acrylic for a nice presentation effect. Leave the speed the same, as if you are engraving clear acrylic, and increase the power about 10 per cent to engrave through the paint. Applying too much power to the paint will melt it and cause distortion.
- Cutting acrylic is usually best achieved with relatively slow speed and higher power. This combination allows the laser beam to melt the edges.
- Acrylics generally require only a single pass to cut, but thicker pieces may need two passes. It is sometimes necessary to mask and dampen the acrylic before cutting.
- Acrylic is very flammable. You should never leave your laser unattended when vector cutting any material.
Glass
When it is etched or engraved, glass produces a classic and sophisticated look, which is why it is a popular material for laser engravers. When a laser strikes glass, it fractures the surface, but it will not engrave deeply or actually remove material. However, this fracturing is what produces the sought-after frosted look.
Unfortunately, if the glass is not protected during the engraving process, the fracturing can cause flaking and unwanted chipping of the engraved area.
The composition and quality of glass varies greatly, which makes it challenging to predict the effect you will achieve. It is recommended to experiment with a variety of glass types, as well as speed and power settings.
 [4]
[4]Tips and techniques
To produce a smooth, frosted finish with minimal chipping, use the following techniques to protect the glass while engraving:
- Using your finger or a paper towel, apply a thin coat of liquid dish soap over the area to be engraved.
- Place the glass into the engraver and laser through the soap while it is still wet. The dish soap is often all that is needed to protect the glass.
Alternatively, you can use this method:
- Cut a piece of newspaper or paper towel a little larger than the area to be engraved.
- Completely soak the paper with water, then wring it out. You can also place the paper on the glass first and use a mister to soak the paper.
- Apply the paper to the glass and smooth it out, so there are no wrinkles.
- Place the glass into the engraver and laser through the paper while it is still wet.
- Remove the glass, discard the remaining paper, and clean the glass.
Using the techniques above will help ensure your glass engraving projects turn out as desired every time.
 [5]
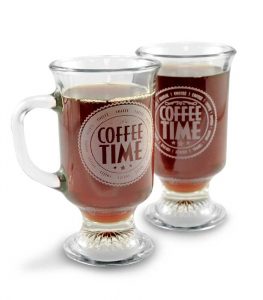
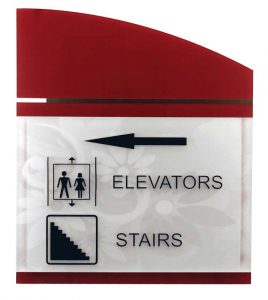
[5]Plastic
Engraving plastics has become more mainstream over the past few years, as manufacturers have created more laser-friendly materials.
Plastic manufacturers have developed a broad range of plastics with thinner cap sheets, which provide much better engraving and cutting characteristics. These plastics are commonly referred to as “micro-laminates,” “micro-surfaced,” or simply “laser engravable plastics.” They are generally very easy to work with since they all have similar characteristics. Although lasering plastic has become more convenient, it is still important to experiment with different plastic materials and power settings. Even if they are from the same manufacturer, different-coloured plastics will have unique speed and power settings.
Tips and techniques
- Always remove the clear protective cover layer before engraving.
- Most laserable plastics can be engraved at high speed with power adjusted accordingly for the wattage of your laser. When experimenting, set your speed to a fast setting, then adjust the power output until you get a nice engraving without any melting.
- With some plastics, it is best to engrave using two passes. The first pass cuts through the cap layer and the second pass cleans away any residue that may be left behind.
- Another useful technique is to mask the plastic before engraving, with transfer or masking tape. This will prevent a buildup of residue on the plastic surface.
- Try misting the transfer tape with water to reduce heat buildup and melting.
- If you do not get acceptable initial results with the recommended speed and power settings, start experimenting by first changing only the power setting. If adjusting the power setting does not work, start over and adjust only the speed setting. Once you have acceptable results, record those settings for that particular plastic, so you do not have to repeat the experimentation process.
Conclusion
Evidently, the question of what speed and power settings to use on different materials is not a simple one to answer, as there are many variables to consider. The recommended settings from your machine’s manufacturer should provide an optimal starting point for all your laser materials. However, experimentation with materials and settings is the best way to achieve the ideal look for each project.
Mike Dean is an owner and vice-president of sales and marketing for Epilog Laser. Known as “Mr. Epilog,” he is one of the founders of the company and has been an important part of its sales channel management, research and development, and product development. Dean is a highly regarded expert in the laser industry, as well as a regular presenter at trade shows and events.
- [Image]: https://www.signmedia.ca/wp-content/uploads/2023/05/engraved-wood-wedding-invites.jpg
- [Image]: https://www.signmedia.ca/wp-content/uploads/2023/05/engrave_wood-cutting-board-engraving.jpg
- [Image]: https://www.signmedia.ca/wp-content/uploads/2023/05/engrave_laser-cut-acrylic-pears.jpg
- [Image]: https://www.signmedia.ca/wp-content/uploads/2023/05/engrave_Coffee_Time_paired.jpg
- [Image]: https://www.signmedia.ca/wp-content/uploads/2023/05/engrave_directional-signage-plastic.jpg
Source URL: https://www.signmedia.ca/a-laser-focused-guide-to-engraving/